In the previous article, we have implemented Two Factor Authentication with Spring Security and a Soft Token. In this article, we are gonna dockerize that application.
Introduction
Let’s have a quick intro to the Docker terminologies.
Docker
Docker is an open platform for developing, shipping, and running applications.
Docker Image
A Docker image is a binary that includes all of the requirements for running a single Docker container, as well as metadata describing its needs and capabilities.
Docker Container
Docker container is a running instance of an image.
Dockerfile
Docker can build images automatically by reading the instructions from a Dockerfile. A Dockerfile is a text document that contains all the commands a user could call on the command line to assemble an image.
Docker Compose
Docker Compose is a tool for defining and running multi-container Docker applications. With Compose, the application’s services will be configured in a YAML file. Then, all the services from the configuration can be started with a single command. To learn more about all the features of Compose, see the list of features.
What You’ll Build
A Docker Compose file to build Docker Images for Spring Boot, Angular and MySQL services and run all of them with a single command.
What You’ll Need
- Docker Desktop for Mac and Windows OS. For older versions of Windows, you might need to install the docker toolbox. You can refer here for installation instructions.
- Maven Wrapper
- Spring Boot + Angular + MySQL Maven Application
Build Spring Boot Application Image
Install Maven Wrapper
Maven Wrapper scripts are a set of files that can be added to your Maven project to build the project without installing maven. When we call the maven wrapper script, it will download and unpack Maven into our ${user.home}/.m2/wrapper/dists folder.
We would need the maven wrapper for building the application image. You can run the following command in the Spring Boot Project directory to install it if you don’t have it already.
mvn -N io.takari:maven:wrapper
Create Spring Boot Dockerfile
Let’s create a Dockerfile in the Spring Boot project directory to build an image. This image will contain JRE, Spring Boot application source code, and its dependencies.
Dockerfile
#### Stage 1: Build the application
FROM openjdk:11-jdk-slim as build

# Set the current working directory inside the image
WORKDIR /app

# Copy maven executable to the image
COPY mvnw .
COPY .mvn .mvn

# Copy the pom.xml file
COPY pom.xml .

# Build all the dependencies in preparation to go offline.
# This is a separate step so the dependencies will be cached unless
# the pom.xml file has changed.
RUN ./mvnw dependency:go-offline -B

# Copy the project source
COPY src src

# Package the application
RUN ./mvnw package -DskipTests
RUN mkdir -p target/dependency && (cd target/dependency; jar -xf ../*.jar)

#### Stage 2: A minimal docker image with command to run the app
FROM openjdk:11-jre-slim

ARG DEPENDENCY=/app/target/dependency

# Copy project dependencies from the build stage
COPY --from=build ${DEPENDENCY}/BOOT-INF/lib /app/lib
COPY --from=build ${DEPENDENCY}/META-INF /app/META-INF
COPY --from=build ${DEPENDENCY}/BOOT-INF/classes /app

ENTRYPOINT ["java","-cp","app:app/lib/*","com.javachinna.DemoApplication"]
Build Angular Application Image
Create Custom NGINX Configuration
We are gonna deploy our Angular application in the NGINX web server. So, let’s create an nginx configuration file.
nginx-custom.conf
server {
listen 80;
location / {
root /usr/share/nginx/html;
index index.html index.htm;
try_files $uri $uri/ /index.html =404;
}
}
Create Angular Dockerfile
Let’s create a Dockerfile in the Angular project directory to build an image. This image will contain NGINX server, Angular source code, and its dependencies.
Dockerfile
#### Stage 1: Build the angular application
FROM node as build

# Configure the main working directory inside the docker image.
# This is the base directory used in any further RUN, COPY, and ENTRYPOINT
# commands.
WORKDIR /app

# Copy the package.json as well as the package-lock.json and install
# the dependencies. This is a separate step so the dependencies
# will be cached unless changes to one of those two files
# are made.
COPY package*.json ./
RUN npm install

# Copy the main application
COPY . ./

# Arguments
ARG configuration=production

# Build the application
RUN npm run build -- --outputPath=./dist/out --configuration $configuration

#### Stage 2, use the compiled app, ready for production with Nginx
FROM nginx

# Copy the angular build from Stage 1
COPY --from=build /app/dist/out/ /usr/share/nginx/html

# Copy our custom nginx config
COPY /nginx-custom.conf /etc/nginx/conf.d/default.conf


# Expose port 80 to the Docker host, so we can access it
# from the outside.
EXPOSE 80

ENTRYPOINT ["nginx","-g","daemon off;"]
Create dockerignore file
To increase the build’s performance, we can create.dockerignore file to the context directory (Angular project directory where the Dockerfile resides) to exclude files and directories that are not needed for building the image.
.dockerignore
node_modules
.git
.gitignore
Create Docker Compose Configuration
We are gonna define 3 services for running Spring Boot, Angular, and MySQL docker containers in docker-compose.yml in the parent directory of Spring and Angular modules.
docker-compose.yml
# Docker Compose file Reference (https://docs.docker.com/compose/compose-file/)
version: '3.7'

# Define services
services:
  # App backend service
  app-server:
    # Configuration for building the docker image for the backend service
    build:
      context: spring-boot-oauth2-social-login # Use an image built from the specified dockerfile in the `spring-boot-oauth2-social-login` directory.
      dockerfile: Dockerfile
    ports:
      - "8080:8080" # Forward the exposed port 8080 on the container to port 8080 on the host machine
    restart: always
    depends_on:
      - db # This service depends on mysql. Start that first.
    environment: # Pass environment variables to the service
      SPRING_DATASOURCE_URL: jdbc:mysql://db:3306/demo?useSSL=false&serverTimezone=UTC&useLegacyDatetimeCode=false&allowPublicKeyRetrieval=true
      SPRING_DATASOURCE_USERNAME: javachinna
      SPRING_DATASOURCE_PASSWORD: javachinna
    networks: # Networks to join (Services on the same network can communicate with each other using their name)
      - backend
      - frontend

  # Frontend Service
  app-client:
    build:
      context: angular-11-social-login # Use an image built from the specified dockerfile in the `angular-11-social-login` directory.
      dockerfile: Dockerfile
      args:
        API_BASE_URL: http://127.0.0.1:8080/
    ports:
      - "8081:80" # Map the exposed port 80 on the container to port 8081 on the host machine
    restart: always
    depends_on:
      - app-server
    networks:
      - frontend

  # Database Service (Mysql)
  db:
    image: mysql:8.0
    ports:
      - "3306:3306"
    restart: always
    environment:
      MYSQL_DATABASE: demo
      MYSQL_USER: javachinna
      MYSQL_PASSWORD: javachinna
      MYSQL_ROOT_PASSWORD: root
    networks:
      - backend

# Networks to be created to facilitate communication between containers
networks:
  backend:
  frontend:
Run the Application
You can run the application with the following command in the project parent directory where the docker-compose file resides
docker-compose up
Output
D:\SourceCode\spring-boot-angular-2fa-demo>docker-compose up
Starting spring-boot-angular-2fa-demo_db_1 ... done
Starting spring-boot-angular-2fa-demo_app-server_1 ... done
Recreating spring-boot-angular-2fa-demo_app-client_1 ... done
Some Useful Docker Compose Commands
Build All Containers
docker-compose build
Build Specific Container
docker-compose build service_name
Build Specific Container without Cache
docker-compose build --no-cache service_name
Show More Output
In case if the Build is stuck in building the image, then add the --verbose option to the command to show more output. So that, you will know what is happening behind the scene and where it is stuck.
docker-compose --verbose up
Remove Containers
To remove the containers, networks, and volumes associated with the containerized environment, use the down command
docker-compose down
Docker Toolbox Configurations
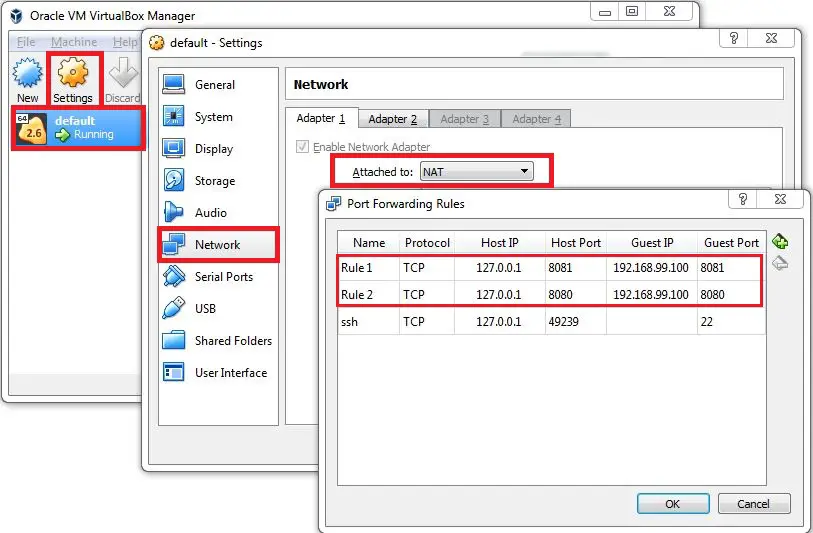
If you are using DockerToolBox and OracleVM VirtualBox, then the default IP is 192.168.99.100 since it’s running a Linux VM in VirtualBox. You can verify the default IP with docker-machine ip command. So, you cannot use localhost to access your application. Instead, you need to use the default IP.
If you wanna use localhost instead of the default IP, then you can follow the below steps:
- Go to Oracle VM VirtualBox Manager
- Click the appropriate machine (probably the one labeled “default”)
- Settings > Network > Adapter 1 (Make sure the network setting is NAT) > Advanced > Port Forwarding
- Click “+” to add a new Rule for port forwarding. Host IP: 127.0.0.1, Guest IP: 192.168.99.100, Host Port and Guest port: 8081 (port exposed by the container)
- Try again to your browser and run http://localhost:8081 or http://127.0.0.1:8081
For this Spring Boot Angular application, I had to add 2 rules since Spring Boot and Angular are configured to run on ports 8080 and 8081 respectively.

Source Code
https://github.com/JavaChinna/spring-boot-angular-2fa-demo
Conclusion
That’s all folks. In this article, we have dockerized our Spring Boot Angular application.
Thank you for reading.


