In the previous article, we have deployed our Multi Container Docker application on Digital Ocean Kubernetes. In this article, we are gonna set up a Continuous Integration and Continuous Delivery pipeline using GitHub Actions to deploy our Angular and Spring Boot Application on Digital Ocean Kubernetes.
Introduction to GitHub Actions
GitHub Actions makes it easy to automate all your software workflows including CI/CD pipeline. You can build, test, and deploy your code right from GitHub. Make code reviews, branch management, and issue triaging work the way you want.
What You’ll Build
CI/CD pipeline to deploy our Angular and Spring Boot Application on Digital Ocean Kubernetes whenever code is committed and pushed to the main branch or a new pull request is created to the main branch.
What You’ll Need
- GitHub account with Spring Boot + Angular + MySQL Docker Project
- DockerHub account
- Spring Boot + Angular + MySQL Docker application running on Digital Ocean Kubernetes Cluster
Setup CI/CD pipeline
Create Secrets for DockerHub
In order to access DockerHub from our workflow, we need DockerHub user name and access token.
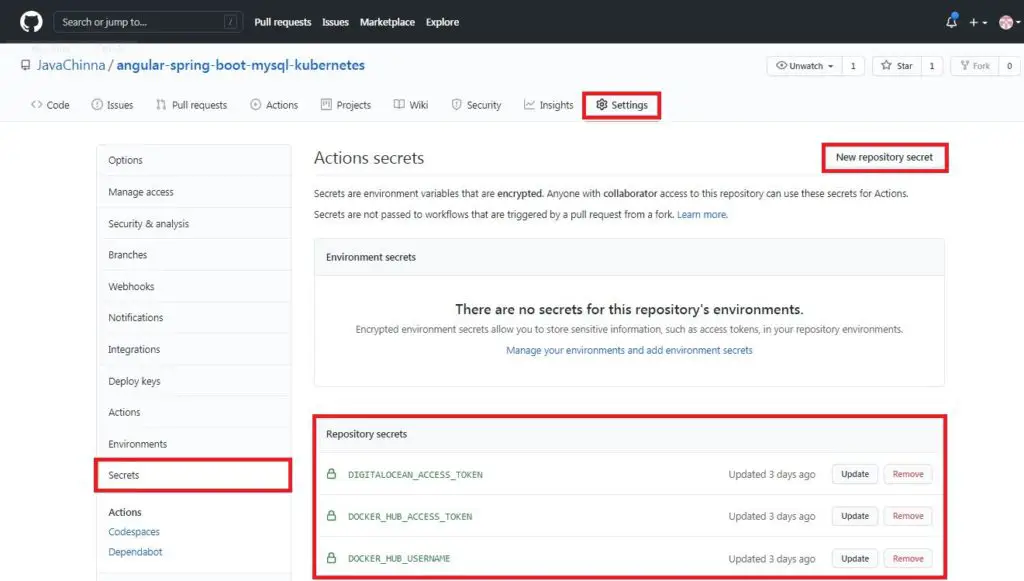
- Let’s add our Docker ID as a secret to GitHub. Navigate to the GitHub repository and click Settings > Secrets > New secret.
- Create a new secret with the name
DOCKER_HUB_USERNAMEand our Docker ID as value. - Create a new Personal Access Token (PAT). To create a new token, go to Docker Hub Settings and then click New Access Token and provide a name.
- Create a new secret with the name
DOCKER_HUB_ACCESS_TOKENand the token as value. Refer to the official docker documentation for more information.
Create Secret for DigitalOcean
We are gonna use doctl to connect to the remote Kubernetes Cluster from our workflow. In order to use doctl, we need to authenticate with DigitalOcean by providing an access token, which can be created from the Applications & API section of the Control Panel as we have already done here.
Once the token is obtained, create a new secret in GitHub with the name DIGITALOCEAN_ACCESS_TOKEN and token as value.
Once all the secrets are created, it will be displayed as shown below.
Set up GitHub Actions workflow
To set up the workflow:
- Go to your repository in GitHub and then click Actions > New workflow.
- Click set up a workflow yourself and add the following content:
digitalocean.yml
on:
  push:
    branches:
      - main
  pull_request:
    branches:
      - main
# Environment variables available to all jobs and steps in this workflow
env:
  ANGULAR_IMAGE_NAME: social-login-app-client
  ANGULAR_CONTAINER_NAME: social-login-app-client
  ANGULAR_DEPLOYMENT_NAME: social-login-app-client
  SPRING_BOOT_IMAGE_NAME: social-login-app-server
  SPRING_BOOT_CONTAINER_NAME: social-login-app-server
  SPRING_BOOT_DEPLOYMENT_NAME: social-login-app-server
jobs:

  build:
    name: Build, push, and deploy
    runs-on: ubuntu-latest
    steps:

    - name: Checkout main
      uses: actions/checkout@main

    - name: Login to Docker Hub
      uses: docker/login-action@v1
      with:
        username: ${{ secrets.DOCKER_HUB_USERNAME }}
        password: ${{ secrets.DOCKER_HUB_ACCESS_TOKEN }}

    - name: Provide permission to run mvnw
      run: chmod +x ./spring-boot-oauth2-social-login/mvnw

    - name: Build and push Angular Image
      id: angular_docker_build
      uses: docker/build-push-action@v2
      with:
        context: ./angular-11-social-login
        file: ./angular-11-social-login/Dockerfile
        push: true
        tags: ${{ secrets.DOCKER_HUB_USERNAME }}/${{ env.ANGULAR_IMAGE_NAME }}:${{ github.sha }}

    - name: Build and push Spring Boot Image
      id: spring-boot-docker_build
      uses: docker/build-push-action@v2
      with:
        context: ./spring-boot-oauth2-social-login
        file: ./spring-boot-oauth2-social-login/Dockerfile
        push: true
        tags:  ${{ secrets.DOCKER_HUB_USERNAME }}/${{ env.SPRING_BOOT_IMAGE_NAME }}:${{ github.sha }}

    - name: Install doctl
      uses: digitalocean/action-doctl@v2
      with:
        token: ${{ secrets.DIGITALOCEAN_ACCESS_TOKEN }}

    - name: Save DigitalOcean kubeconfig with short-lived credentials
      run: doctl kubernetes cluster kubeconfig save --expiry-seconds 600 k8s-1-20-2-do-0-blr1-1619022201280

    # Deploy Angular & Spring Boot Docker image to the DigitalOcean kubernetes cluster
    - name: Deploy
      run: |-
        kubectl set image deployment/${{env.ANGULAR_DEPLOYMENT_NAME}} ${{env.ANGULAR_CONTAINER_NAME}}=${{ secrets.DOCKER_HUB_USERNAME }}/${{ env.ANGULAR_IMAGE_NAME }}:${{ github.sha }}
        kubectl set image deployment/${{env.SPRING_BOOT_DEPLOYMENT_NAME}} ${{ env.SPRING_BOOT_CONTAINER_NAME}}=${{ secrets.DOCKER_HUB_USERNAME }}/${{ env.SPRING_BOOT_IMAGE_NAME }}:${{ github.sha }}
        kubectl rollout status deployment/${{env.ANGULAR_DEPLOYMENT_NAME}}
        kubectl rollout status deployment/${{env.SPRING_BOOT_DEPLOYMENT_NAME}}
        kubectl get services -o wide
Most of the content above is self-explanatory. Here are some more points to note:
- We have included
pull_requestaction along withpushaction to run the workflow. This is helpful when we want to build and deploy the code to the staging environments and do a test before merging the pull request into the master branch. - Make sure to replace the Kubernetes cluster name k8s-1-20-2-do-0-blr1-1619022201280 with your cluster name
- In the deployment step,
- We have used
kubectl set imagecommand to update the image name in the deployments that we have already deployed in the previous article withapp-client.ymlandapp-server.ymlrespectively. - In Kubernetes, rolling updates are the default strategy to update the running version of your app. The rolling update cycles the previous Pod out and bring newer Pod in incrementally.
kubectl rollout statuscommand is used to check the status of the rollout.kubectl get serviceswill list all the services.-o wideoption specifies thewideoutput format.- Here is the complete output of the deploy step:
- We have used
Run kubectl set image deployment/social-login-app-client social-login-app-client=***/social-login-app-client:a88905b1023fa27f037a1409bff4394785367886
deployment.apps/social-login-app-client image updated
deployment.apps/social-login-app-server image updated
Waiting for deployment "social-login-app-client" rollout to finish: 1 old replicas are pending termination...
Waiting for deployment "social-login-app-client" rollout to finish: 1 old replicas are pending termination...
deployment "social-login-app-client" successfully rolled out
Waiting for deployment "social-login-app-server" rollout to finish: 1 old replicas are pending termination...
Waiting for deployment "social-login-app-server" rollout to finish: 1 old replicas are pending termination...
deployment "social-login-app-server" successfully rolled out
NAME                      TYPE        CLUSTER-IP      EXTERNAL-IP   PORT(S)          AGE    SELECTOR
kubernetes                ClusterIP   10.245.0.1      <none>        443/TCP          3d1h   <none>
social-login-app-client   NodePort    10.245.73.204   <none>        8081:32496/TCP   3d1h   app=social-login-app-client
social-login-app-mysql    ClusterIP   None            <none>        3306/TCP         3d1h   app=social-login-app,tier=mysql
social-login-app-server   NodePort    10.245.141.20   <none>        8080:31311/TCP   3d1h   app=social-login-app-server
Commit To Run Workflow
Let’s do a commit to the main branch and check the progress of the workflow
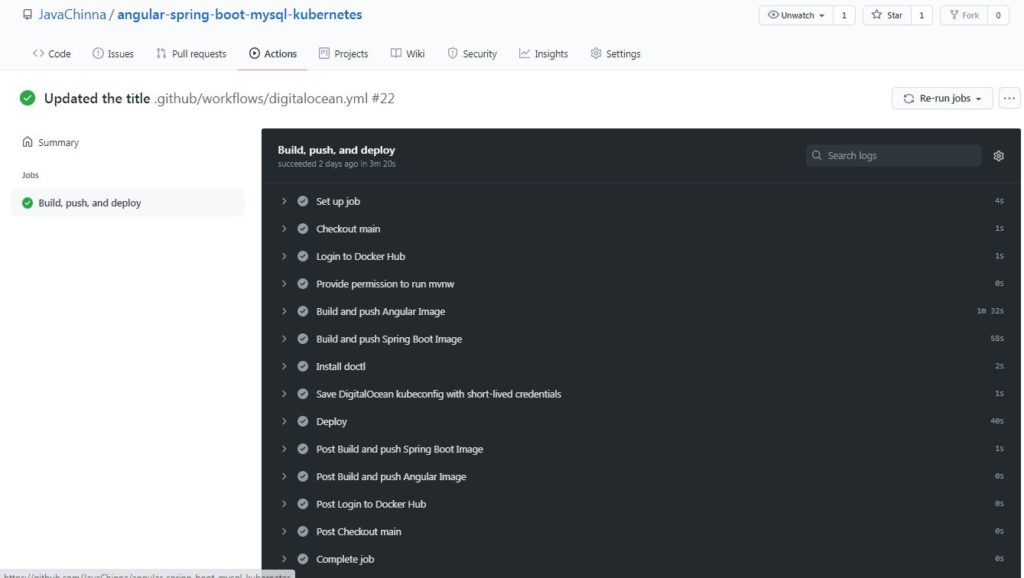
Now we should be able to see the updated version of the application running in the Kubernetes Cluster.
Source Code
https://github.com/JavaChinna/angular-spring-boot-mysql-kubernetes
Conclusion
That’s all folks. In this article, we have created CI/CD pipeline for our Spring Boot Angular application to deploy on Digital Ocean Kubernetes Cluster.
Disclosure: Please note that some of the links above are referral links and at no additional cost to you, I’ll get some credits.
Thank you for reading.


Why when i push code to dev branch, workflow got executed and it reruns kubernetes app and update app?
The workflow will get executed only for the branches you have specified in the yml file. Did you specify dev branch there?